


Guide for Enrolling for Employee Health Cards with Pictures and Examples. It was already posted before in our Website on How to Enroll for Health Cards. But as there is some Doubts on Applying for Health cards, Here we present the Pictorial process of applying for Health Cards. Just Follow the Steps given below, and apply for Health Cards. This is the User manual.
The purpose of the post is to make the user understand how to get enrolled in the EHS scheme. Employee once enrolled under the scheme will be issued Health Card and avail the benefit. If not enrolled, he/she cannot avail the benefits under the scheme. The document will give a complete screen shots of how the employee needs to enroll under the scheme. The guidelines of the scheme is inbuilt in the software application so that it will guide the user on how to get enrolled under the scheme.
2. Login as Employee with respective Employee ID & Password as shown in screen shot I.

3. Click on 'Registrations' tab as shown in screen shot II.
- Initiate Health Card/View Application:
This is to initially enroll for an health card or to view the already enrolled application.
-Initiate New/Rejected Beneficiaries:
This is to add beneficiary or to remove already added beneficiary.
-Download Health Card:
For downloading the health card, initially the submitted application has to be approved.
-Case Sheet: To check the status of patient health record.
4. Click on Registrations → Initiate Health Card/View Application as shown BELOW.

5. On clicking on 'Initiate Health Card/View Application' tab, a screen will be displayed wherein the user(employee) has to provide either Aadhaar No. (or) Aadhaar Enrollment No. for applying for an Health Card as shown

6. On selecting either of the radio button(Aadhaar No. (or) Aadhaar Enrollment No.), a text box is provided for entering the Aadhaar/Aadhaar Enrollment No., Once entered the appropriate number, click on 'Retrieve Details' button as shown in screen shot III.
7. On clicking 'Retrieve' button, a page will be displayed as shown in screen shot IV wherein all the mandatory details to be filled by the user(employee) which includes personal details(includes Date of Joining),address details(Residential + office address),identification details,posting details,pay details,CIC details.

8. After providing the mandatory information, the user(employee) needs to 'save' the application form. On clicking save button, a message will be displayed as 'Enrollment application saved successfully'. Click OK.

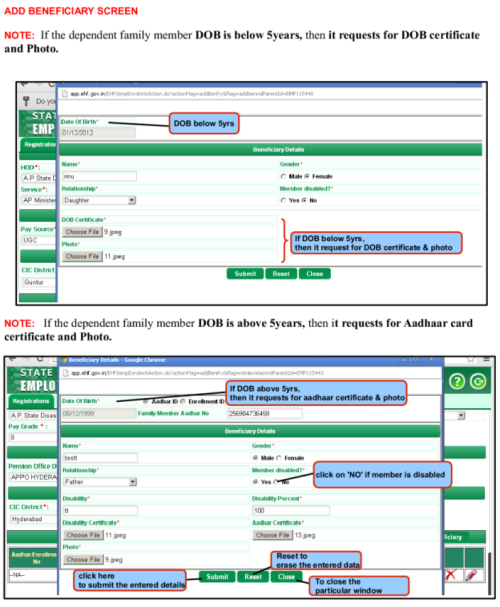
ADD BENEFICIARY SCREEN
NOTE: If the dependent family member DOB is below 5years, then it requests for DOB certificate and Photo.

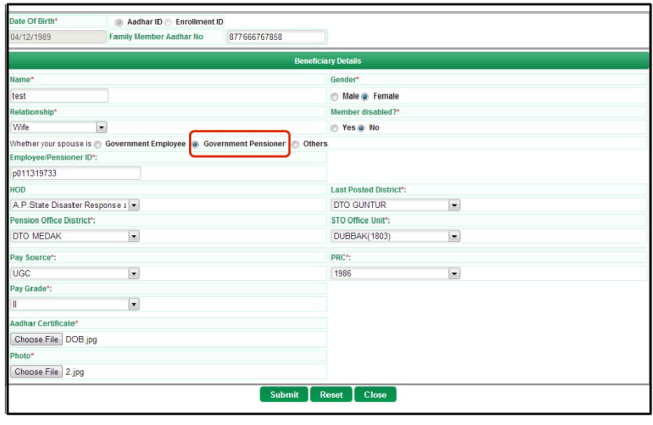
NOTE: If the dependent family member spouse is Govt Employee/Govt Pensioner/Others, then it requests for:
For Example:
If the Spouse is a Government Pensioner:
Govt. Pensioner: it requests for Employee/Pensioner ID,HOD,Last Posted District,Pension Office District, STO Office Unit, Pay Source,PRC, Pay Grade, Aadhaar Certificate & Photo.
 If the Spouse is a Government Employee:
Govt. Employee: it requests for Employee/Pensioner ID,HOD, District, DDO Code,
Designation,Service,Category,Pay Source, PRC, Pay Grade, Current Pay, Certificate, Photo & Service
Register Attachment.

Conditions for adding beneficiary:
(1) If the dependent family member DOB is above 5years, then it requests for Aadhaar card certificate and Photo.
(2) If the dependent family member DOB is below 5years, then it requests for DOB certificate and Photo.
(3) Beneficiary once added for any relationship, cannot be added twice in dependent family
(4) members details.
(5) Son's age greater than 25 can not be added. If son is disabled, then age greater that 25 will beaccepted.
(7) Dependent's daughter age greater than 25 is acceptable.
(8) Relationship and Gender must match.
10. After adding the family member details, the user(employee) can find few options like:
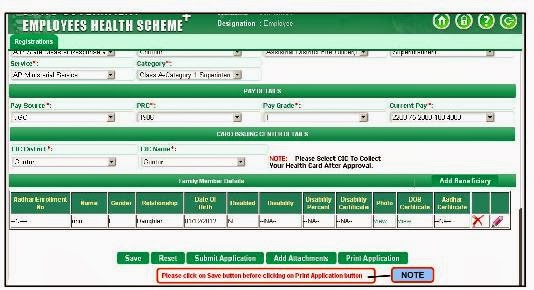
11. Before submitting the application, the user has a provision to add mandatory attachments and then to 'print the application' for verification/cross checking purpose. Once done with verification, the user can submit the application form as shown

NOTE: Once the application form is submitted, the user has no provision to modify the details.
12. On clicking 'Submit Application', a message ' Enrollment initiated successfully with Enrollment ID EMP222222 and signed application form is pending to upload' will be displayed as shown.

13. Once the enrollment initiated successfully, the user(employee) needs to attach the signed
application form as shown in screen shot X.
-Submit for Approval: is to submit the verified application to the concerned person.
-Add attachments: is a provision to upload the scanned copy of the signed
application form.
-View Attachments: is to view the previously added attachments.
-Print/View Application: is to view the printed application.

Process Flow after the user(employee) submits the application form:
Once the user(employee) submits the application form, the form moves to executive(trust) for approval process wherein the the executive has option to Verify/Reject/On hold/Add attachments/Close.
Verify: Once the application form is verified, the request will go to concerned DDO for further process. DDO has an option to either Approve/Reject the application form. If Rejected, it goes back to employee for correction. If Approved, the application form goes to the card vendor wherein a temporary card will be generated for the beneficiary.
Reject: Once the application form is rejected, the application form is sent back to the user(employee) for verification process.
On Hold: Executive has a provision to keep the request 'on hold'. If the request is on hold, it goes to Team Leader(TL) wherein he has a provision to either Approve/Reject the application form. If Rejected, it goes back to employee for correction. If Approved, the application form goes to the concerned DDO and the process flows again from DDO.
The purpose of the post is to make the user understand how to get enrolled in the EHS scheme. Employee once enrolled under the scheme will be issued Health Card and avail the benefit. If not enrolled, he/she cannot avail the benefits under the scheme. The document will give a complete screen shots of how the employee needs to enroll under the scheme. The guidelines of the scheme is inbuilt in the software application so that it will guide the user on how to get enrolled under the scheme.
Details on How to Apply for Health Cards with Pictures
1. Login to the EHS web portal using the URL www.ehf.gov.in. or the Link given below.2. Login as Employee with respective Employee ID & Password as shown in screen shot I.

3. Click on 'Registrations' tab as shown in screen shot II.
- Initiate Health Card/View Application:
This is to initially enroll for an health card or to view the already enrolled application.
-Initiate New/Rejected Beneficiaries:
This is to add beneficiary or to remove already added beneficiary.
-Download Health Card:
For downloading the health card, initially the submitted application has to be approved.
-Case Sheet: To check the status of patient health record.
4. Click on Registrations → Initiate Health Card/View Application as shown BELOW.

5. On clicking on 'Initiate Health Card/View Application' tab, a screen will be displayed wherein the user(employee) has to provide either Aadhaar No. (or) Aadhaar Enrollment No. for applying for an Health Card as shown

6. On selecting either of the radio button(Aadhaar No. (or) Aadhaar Enrollment No.), a text box is provided for entering the Aadhaar/Aadhaar Enrollment No., Once entered the appropriate number, click on 'Retrieve Details' button as shown in screen shot III.
7. On clicking 'Retrieve' button, a page will be displayed as shown in screen shot IV wherein all the mandatory details to be filled by the user(employee) which includes personal details(includes Date of Joining),address details(Residential + office address),identification details,posting details,pay details,CIC details.
Filling Personal Details

8. After providing the mandatory information, the user(employee) needs to 'save' the application form. On clicking save button, a message will be displayed as 'Enrollment application saved successfully'. Click OK.
9. Once the application form is saved, the user(employee) has a provision to 'add family member
details' as shown below.

ADD BENEFICIARY SCREEN
NOTE: If the dependent family member DOB is below 5years, then it requests for DOB certificate and Photo.
NOTE: If the dependent family member spouse is Govt Employee/Govt Pensioner/Others, then it requests for:
For Example:
If the Spouse is a Government Pensioner:
Govt. Pensioner: it requests for Employee/Pensioner ID,HOD,Last Posted District,Pension Office District, STO Office Unit, Pay Source,PRC, Pay Grade, Aadhaar Certificate & Photo.
Govt. Employee: it requests for Employee/Pensioner ID,HOD, District, DDO Code,
Designation,Service,Category,Pay Source, PRC, Pay Grade, Current Pay, Certificate, Photo & Service
Register Attachment.

Conditions for adding beneficiary:
(1) If the dependent family member DOB is above 5years, then it requests for Aadhaar card certificate and Photo.
(2) If the dependent family member DOB is below 5years, then it requests for DOB certificate and Photo.
(3) Beneficiary once added for any relationship, cannot be added twice in dependent family
(4) members details.
(5) Son's age greater than 25 can not be added. If son is disabled, then age greater that 25 will beaccepted.
(7) Dependent's daughter age greater than 25 is acceptable.
(8) Relationship and Gender must match.
10. After adding the family member details, the user(employee) can find few options like:
- Save: Save tab is to save the enrolled application.
- Reset: Reset tab is to erase the entered data and re-enter the details.
- Submit Application: is to submit the filled application form.
- Add attachments: Relevant attachments to be added either mandatory or non mandatory.
- Print Application: In order to print the application, the user should for compulsion

11. Before submitting the application, the user has a provision to add mandatory attachments and then to 'print the application' for verification/cross checking purpose. Once done with verification, the user can submit the application form as shown

12. On clicking 'Submit Application', a message ' Enrollment initiated successfully with Enrollment ID EMP222222 and signed application form is pending to upload' will be displayed as shown.
application form as shown in screen shot X.
-Submit for Approval: is to submit the verified application to the concerned person.
-Add attachments: is a provision to upload the scanned copy of the signed
application form.
-View Attachments: is to view the previously added attachments.
-Print/View Application: is to view the printed application.

Process Flow after the user(employee) submits the application form:
Once the user(employee) submits the application form, the form moves to executive(trust) for approval process wherein the the executive has option to Verify/Reject/On hold/Add attachments/Close.
Verify: Once the application form is verified, the request will go to concerned DDO for further process. DDO has an option to either Approve/Reject the application form. If Rejected, it goes back to employee for correction. If Approved, the application form goes to the card vendor wherein a temporary card will be generated for the beneficiary.
Reject: Once the application form is rejected, the application form is sent back to the user(employee) for verification process.
On Hold: Executive has a provision to keep the request 'on hold'. If the request is on hold, it goes to Team Leader(TL) wherein he has a provision to either Approve/Reject the application form. If Rejected, it goes back to employee for correction. If Approved, the application form goes to the concerned DDO and the process flows again from DDO.
Click Below to Apply or Login


Useful Information Links on Health Cards:
1.GO.174 Employee Health Schme Cashless Medical Treatment to Employees
2.GO.175 Operational Guidelines and Process for Issue of Health Cards.
3.GO.176 List of Therapies (Diseses) and Package Rates
4.GO.184,186 Health Cards Guidelines Issued Previous Year
5.GO.1837 Enrolling for Health Cards through MEESEVA and Rates for Enrolment
6.How to Appply for Health Cards - Video Tutorials click Here